part1: 拉取 Yolov7 仓库并配置适用的虚拟环境
part1-1: 安装 Git 和 MiniConda
Git 是一个分布式版本控制系统,主要用于跟踪代码变更、协作开发和版本管理。
下载地址&官网: Git
MiniConda 是 Anaconda 的轻量版,用于管理 Python 环境和包。
下载地址&官网:Distribution/Free Download
part1-2: 拉取仓库并配置 Python 虚拟环境
使用 git 拉取 Yolov7 的仓库。
cd <你的代码工作目录>
git clone https://github.com/WongKinYiu/yolov7.git
cd yolov7
仓库内提供了 requirements.txt ,其列出了项目所依赖的所有第三方库及其版本信息。使用 conda 新建一个 Python 虚拟环境,切换至刚刚创建的环境,接着使用环境中的包管理工具 pip 来安装所需的第三方包。
conda create --name yolov7 python=3.8 -y
conda activate yolov7
pip install -r requirements.txt
part2: 跑通项目前的一些准备
part2-0: 了解 Yolov7 仓库的项目结构
part2-0-1 目录结构
.
├── cfg // 模型配置文件
│   ├── baseline // 基础配置文件,定义了不同网络架构的 YAML 文件
│   │   ├── r50-csp.yaml
│   │   ├── x50-csp.yaml
│   │   ├── yolor-csp-x.yaml
│   │   ├── yolor-csp.yaml
│   │   ├── yolor-d6.yaml
│   │   ├── yolor-e6.yaml
│   │   ├── yolor-p6.yaml
│   │   ├── yolor-w6.yaml
│   │   ├── yolov3-spp.yaml
│   │   ├── yolov3.yaml
│   │   └── yolov4-csp.yaml
│   ├── deploy // 部署配置文件,针对特定的 YOLOv7 变种进行配置
│   │   ├── yolov7-d6.yaml
│   │   ├── yolov7-e6e.yaml
│   │   ├── yolov7-e6.yaml
│   │   ├── yolov7-tiny-silu.yaml
│   │   ├── yolov7-tiny.yaml
│   │   ├── yolov7-w6.yaml
│   │   ├── yolov7x.yaml
│   │   └── yolov7.yaml
│   └── training // 训练时使用的配置文件
│       ├── yolov7-d6.yaml
│       ├── yolov7-e6e.yaml
│       ├── yolov7-e6.yaml
│       ├── yolov7-tiny.yaml
│       ├── yolov7-w6.yaml
│       ├── yolov7x.yaml
│       └── yolov7.yaml
├── data // 包含了训练和推理时使用的数据配置文件
│   ├── coco.yaml
│   ├── hyp.scratch.custom.yaml
│   ├── hyp.scratch.p5.yaml
│   ├── hyp.scratch.p6.yaml
│   └── hyp.scratch.tiny.yaml
├── deploy // 将 YOLOv7 部署为 TensorRT 引擎到 Triton 推理服务器
├── detect.py // 检测脚本
├── export.py // 模型导出脚本
├── figure // 存放着一些预测结果
├── hubconf.py
├── inference // 推理时使用到的一些资源
├── LICENSE.md
├── models // 包含 YOLOv7 模型的实现代码
│   ├── common.py
│   ├── experimental.py
│   └── yolo.py
├── paper // 论文
│   └── yolov7.pdf
├── README.md
├── requirements.txt // 记录项目运行所依赖的第三方包
├── runs // 存放每次 train/detect 的记录,如训练后的权重、检测结果图、损失图等
│   └── detect
│       ├── exp
│       └── exp2
├── scripts // 辅助脚本
│   └── get_coco.sh
├── test.py
├── tools // 包含了一些用于模型比较、可视化、转换等操作的工具脚本
├── traced_model.pt // 追踪模型
├── train_aux.py // train_aux.py 包含一些辅助功能或代码
├── train.py // train.py 是主要的训练脚本
├── utils // 存放一些工具函数
├── yolov7.pt
└─── yolov7-tiny.pt
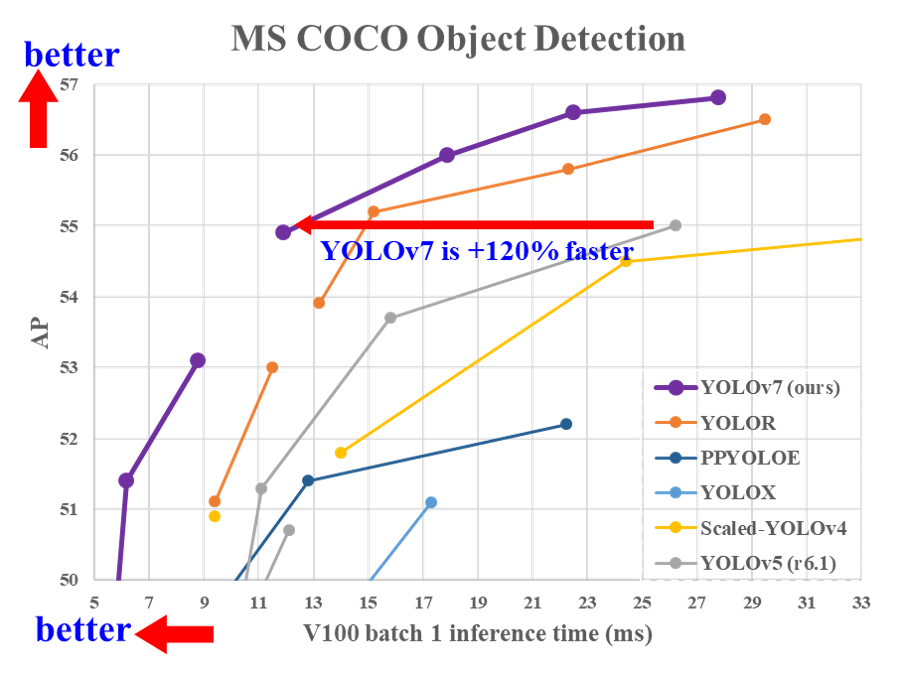
part2-0-2 性能对比
part3: 把项目跑起来
part3-1: 推理
part3-2: 训练
python train.py --weights yolov7-tiny.pt --data data/<你的数据集配置.yaml> --hyp data/hyp_scratch.tiny.yaml
hyp 是 hyperparameters(超参数)的缩写,表示模型训练过程中使用的各种超参数配置。
train.py 会启动 TensorBoard,训练进行时可以用浏览器打开 TensorBoard 查看当前的训练情况。
“ TensorBoard 是一个强大的可视化工具,它可以帮助开发者在训练模型时更好地理解和调试模型。它通过提供损失、准确率、图像示例等多种类型的日志信息,使得模型训练过程的分析和改进变得更加直观和方便。TensorBoard 不仅可以用于 TensorFlow,也可以与 PyTorch 等其他框架结合使用。”
训练完成后,可以在 runs/train 中找到对应的 exp<n> 文件夹,里面存放着本次训练产生的各种文件。
.
├── confusion_matrix.png // 混淆矩阵,用于可视化模型在不同类别上的分类性,显示了模型预测的类别与实际类别之间的关系
├── events.out.tfevents.1706176268.featurize.23402.0 // TensorBoard 日志文件,用于可视化训练过程中的损失、指标等,可以使用TensorBoard加载该文件进行更详细的分析
├── F1_curve.png // F1分数曲线,F1是精确率(Precision)和召回率(Recall)的调和平均值
├── hyp.yaml  // 超参数配置文件
├── opt.yaml  // 训练选项配置文件
├── P_curve.png // 精确率(Precision)曲线,展示了模型在不同置信度阈值下的精确率变化
├── PR_curve.png // 精确率-召回率曲线(Precision-Recall Curve),用于评估模型在不同阈值下的精确率和召回率的平衡
├── R_curve.png // 召回率(Recall)曲线,展示了模型在不同置信度阈值下的召回率变化
├── results.png // 训练结果的汇总图
├── results.txt // 训练结果的文本文件,记录了每一轮训练的具体指标
├── test_batch0_labels.jpg // 测试集的真实标签可视化图像
├── test_batch0_pred.jpg // 测试集的预测结果可视化图像
├── ...
├── test_batch2_labels.jpg
├── test_batch2_pred.jpg
├── train_batch0.jpg // 训练集的批次可视化图像
├── ...
├── train_batch9.jpg
└── weights
    ├── best_218.pt
    ├── ...        // 训练过程中不同阶段表现最好的模型权重文件
    ├── best_458.pt
    ├── best.pt // 训练过程中表现最好的模型权重文件
    ├── epoch_000.pt
    ├── ...     // 每一轮训练生成的模型权重文件
    ├── epoch_999.pt
    ├── init.pt // 初始化模型权重文件,通常是训练开始前的初始权重
    └── last.pt // 最后一轮训练生成的模型权重文件
part4: 部署到 Android —— 使用 ncnn
ncnn 是腾讯发布的一个开源的、专为移动设备优化的神经网络推理框架:
part4-0: 使用 export.py 导出非 end2end 的 onnx 模型
需要一个非 end2end 的模型,即去掉模型的 Detect 层,Detect 层的功能在推理程序的后处理部分完成。
python export.py --weights yolov7-tiny.pt --img-size 640 640
part4-1: 使用 pnnx 转化为 ncnn
ncnn 提供了转化工具 pnnx,可以通过 pip 安装:
pip install pnnx
使用教程可见官方文档:Tencent/ncnn: use ncnn with pytorch or onnx
这里以 yolov7-tiny.pt 为例,使用 pnnx 转化的指令为:
pnnx yolov7-tiny.onnx
part4-2: 使用 cpp + NDK 编写推理程序
这部分基于一个 ncnn + yolov7 的 Android 例程:
下面是提取推理结果的代码片段,其实就是实现了 Detect 检测层的功能:
// app/src/main/jni/yolo.cpp
static void generate_proposals(const ncnn::Mat &anchors, int stride, const ncnn::Mat &in_pad,
                               const ncnn::Mat &feat_blob, float prob_threshold,
                               std::vector<Object> &objects) {
  const int num_grid_x = feat_blob.w;
  const int num_grid_y = feat_blob.h;

  const int num_anchors = anchors.w / 2;

  const int num_class = feat_blob.c / num_anchors - 5;

  const int feat_offset = num_class + 5;

  // 遍历各个锚框,一般每个尺寸的特征图对应三个锚框
  for (int q = 0; q < num_anchors; q++) {
    const float anchor_w = anchors[q * 2];
    const float anchor_h = anchors[q * 2 + 1];

    // 解析特征图得到推理结果,这部分代码可以参考 yolov7 的 Detect 层代码实现
    for (int i = 0; i < num_grid_y; i++) {
      for (int j = 0; j < num_grid_x; j++) {
          // 寻找 score 最大的 class,这部分不属于 Detect 层
          int class_index = 0;
          float class_score = -FLT_MAX;
          for (int k = 0; k < num_class; k++) {
            float score = feat_blob.channel(q * feat_offset + 5 + k).row(i)[j];
            if (score > class_score) {
              class_index = k;
              class_score = score;
            }
          }

          float box_score = feat_blob.channel(q * feat_offset + 4).row(i)[j];

          float confidence = sigmoid(box_score) * sigmoid(class_score);

          if (confidence >= prob_threshold) {
            // 参考 yolov7/models/yolo.py Detect forward
            // y = x[i].sigmoid()
            // y[..., 0:2] = (y[..., 0:2] * 2. - 0.5 + self.grid[i].to(x[i].device)) * self.stride[i]  # xy
            // y[..., 2:4] = (y[..., 2:4] * 2) ** 2 * self.anchor_grid[i]  # wh

            float dx = sigmoid(feat_blob.channel(q * feat_offset + 0).row(i)[j]);
            float dy = sigmoid(feat_blob.channel(q * feat_offset + 1).row(i)[j]);
            float dw = sigmoid(feat_blob.channel(q * feat_offset + 2).row(i)[j]);
            float dh = sigmoid(feat_blob.channel(q * feat_offset + 3).row(i)[j]);

            float pb_cx = (dx * 2.f - 0.5f + j) * stride;
            float pb_cy = (dy * 2.f - 0.5f + i) * stride;

            float pb_w = pow(dw * 2.f, 2) * anchor_w;
            float pb_h = pow(dh * 2.f, 2) * anchor_h;

            float x0 = pb_cx - pb_w * 0.5f;
            float y0 = pb_cy - pb_h * 0.5f;
            float x1 = pb_cx + pb_w * 0.5f;
            float y1 = pb_cy + pb_h * 0.5f;

            Object obj;
            obj.rect.x = x0;
            obj.rect.y = y0;
            obj.rect.width = x1 - x0;
            obj.rect.height = y1 - y0;
            obj.label = class_index;
            obj.prob = confidence;

            objects.push_back(obj);
          }
      }
    }
  }
}
从模型中提取三种尺寸的特征图输出,经过后处理后得到推理结果:
int Yolo::detect(const cv::Mat &rgb, std::vector<Object> &objects, float prob_threshold,
                 float nms_threshold) {
    int img_w = rgb.cols;
    int img_h = rgb.rows;
    // letterbox pad to multiple of 32
    int w = img_w;
    int h = img_h;
    float scale = 1.f;
    if (w > h) {
        scale = (float) target_size / w;
        w = target_size;
        h = h * scale;
    } else {
        scale = (float) target_size / h;
        h = target_size;
        w = w * scale;
    }
    const int max_stride = 64;
    ncnn::Mat in = ncnn::Mat::from_pixels_resize(rgb.data, ncnn::Mat::PIXEL_RGB, img_w, img_h, w,
                                                 h);

    // pad to target_size rectangle
    int wpad = (w + max_stride - 1) / max_stride * max_stride - w;
    int hpad = (h + max_stride - 1) / max_stride * max_stride - h;
    ncnn::Mat in_pad;
    ncnn::copy_make_border(in, in_pad, hpad / 2, hpad - hpad / 2, wpad / 2, wpad - wpad / 2,
                           ncnn::BORDER_CONSTANT, 114.f);
    in_pad.substract_mean_normalize(0, norm_vals);

    ncnn::Extractor ex = yolo.create_extractor();

    ex.input("in0", in_pad);

    std::vector<Object> proposals;

    // stride 8
    {
        ncnn::Mat out;
        ex.extract("out0", out);

        ncnn::Mat anchors(6);
        anchors[0] = 12.f;
        anchors[1] = 16.f;
        anchors[2] = 19.f;
        anchors[3] = 36.f;
        anchors[4] = 40.f;
        anchors[5] = 28.f;

        std::vector<Object> objects8;
        generate_proposals(anchors, 8, in_pad, out, prob_threshold, objects8);

        proposals.insert(proposals.end(), objects8.begin(), objects8.end());
    }

    // stride 16
    {
        ncnn::Mat out;
        ex.extract("out1", out);

        ncnn::Mat anchors(6);
        anchors[0] = 36.f;
        anchors[1] = 75.f;
        anchors[2] = 76.f;
        anchors[3] = 55.f;
        anchors[4] = 72.f;
        anchors[5] = 146.f;

        std::vector<Object> objects16;
        generate_proposals(anchors, 16, in_pad, out, prob_threshold, objects16);

        proposals.insert(proposals.end(), objects16.begin(), objects16.end());
    }

    // stride 32
    {
        ncnn::Mat out;
        ex.extract("out2", out);

        ncnn::Mat anchors(6);
        anchors[0] = 142.f;
        anchors[1] = 110.f;
        anchors[2] = 192.f;
        anchors[3] = 243.f;
        anchors[4] = 459.f;
        anchors[5] = 401.f;

        std::vector<Object> objects32;
        generate_proposals(anchors, 32, in_pad, out, prob_threshold, objects32);

        proposals.insert(proposals.end(), objects32.begin(), objects32.end());
    }

    // sort all proposals by score from highest to lowest
    qsort_descent_inplace(proposals);

    // apply nms with nms_threshold
    std::vector<int> picked;
    nms_sorted_bboxes(proposals, picked, nms_threshold);

    int count = picked.size();

    objects.resize(count);
    for (int i = 0; i < count; i++) {
        objects[i] = proposals[picked[i]];

        // adjust offset to original unpadded
        float x0 = (objects[i].rect.x - (wpad / 2)) / scale;
        float y0 = (objects[i].rect.y - (hpad / 2)) / scale;
        float x1 = (objects[i].rect.x + objects[i].rect.width - (wpad / 2)) / scale;
        float y1 = (objects[i].rect.y + objects[i].rect.height - (hpad / 2)) / scale;

        // clip
        x0 = std::max(std::min(x0, (float) (img_w - 1)), 0.f);
        y0 = std::max(std::min(y0, (float) (img_h - 1)), 0.f);
        x1 = std::max(std::min(x1, (float) (img_w - 1)), 0.f);
        y1 = std::max(std::min(y1, (float) (img_h - 1)), 0.f);

        objects[i].rect.x = x0;
        objects[i].rect.y = y0;
        objects[i].rect.width = x1 - x0;
        objects[i].rect.height = y1 - y0;
    }

    return 0;
}
part4-2-1: 匹配模型输出端
extract 的第一个入参要注意与实际模型的输出端名称匹配。
ex.extract("out0", out);
可以以文本方式打开使用 pnnx 转换后得到的 yolov7_tiny.pnnx.param,查看输出端的名称。
# Op                     # Name                   # Attr
pnnx.Output              out0                     1 0 135 #135=(1,3,80,80,85)f32
pnnx.Output              out1                     1 0 138 #138=(1,3,40,40,85)f32
pnnx.Output              out2                     1 0 141 #141=(1,3,20,20,85)f32
part4-3: 加载 .param 和 .bin
ncnn 模型文件分为网络结构文件.param和权重参数.bin,放到工程目录下的 app/src/main
/assets 中,加载代码部分在 app/src/main/jni/yolo.cpp 的 Yolo::load 函数。